3D Printing and Fabrication
One of the biggest advances in recent years has been the democratization of 3D fabrication through consumer grade technologies like 3D printers, CNC routers and mills, and laser cutters. These tools allow digital 3D models that were previously only viewable through the imperfect 2D interface of a monitor screen or a 3D Virtual Reality headset to be brought into physical reality fairly easily and cheaply.


In groups: spend 5 minutes exploring one of the following 3D modeling/printing projects below or the Book of Fortresses and Battle of Mount Street Bridge projects I asked you to explore and read about for today:
Designate a reporter and answer the following 4 questions on a stretch of whiteboard:
- How do the analog and digital interact in this project?
- What new perspectives does it develop on presentation to diverse audiences?
- What new arguments or interpretations does it advance?
- What new possibilities does it suggest for your future work?
Plastic Buildings and Wooden Maps
The last pre-pandemic class was able to explore 3D fabrication by taking advantage of our brand new Makerspace in Anderson Hall, and the expert guidance of its manager, Aaron Heidgerken-Greene, to make a hybrid digital/physical 3D model of Carleton’s Campus. This project moved back and forth across the analog/digital divide as we…
…researched the history of the physical buildings on Carleton’s campus to create a digital repository of archival images for each.

… refined a 3D digital model of each building that previous students working with our GIS Specialist Wei-Hsin Fu and our Academic Technologist for Digital Scholarship Andrew Wilson had already made.
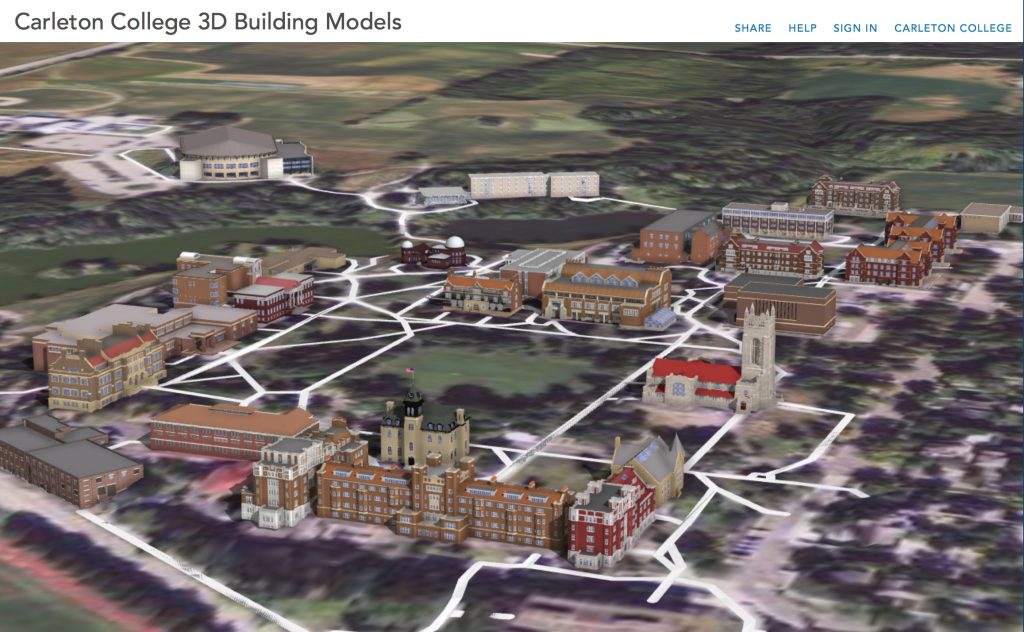
… made a GIS digital map of campus with contour lines for topography, and buildings color coded by use: residential, academic, or other.

… 3D printed tiny physical versions of the digital building models

… and positioned them on a physical version of the digital map laser cut out of wood

… and finally linked the physical product to the digital repository via a QR code in the lower right portion of the map, so viewers can read more about each building and the sources underlying the reconstruction.
Digitizing Museum Objects
This year, you are all helping launch a new ambitious effort to begin 3D modeling/printing and exhibiting objects from the Carleton archival, library and museum collections. We are going to be digitizing objects in the Perlamn Teaching Museum collection and curating them both digitally (in an online repository like Omeka) and in remediated hybrid digital/physical form as 3D printed solids interpreted through the Museum in a Box project.

We will experiment with individual components today, and you can consider what you might do along these lines in your future work.
Processing a 3D model for printing
In order to print successfully a 3D model needs to be an entirely enclosed solid. That means it needs to be:
- Watertight (i.e. have no holes)
- Non-zero width (i.e. cannot be a true 2D plane)
- Oriented correctly (i.e. cannot have “reversed faces”)
In addition, the model should be set up with its origin centered, so that the model will import and rotate easily in printers or other 3D viewing/editing software.
There are many ways to clean an STL file, which is the preferred format for 3D printing, that range from free software to very expensive licensed options.
We will be using a dedicated free service from Formware to optimize for printing.
EXERCISE: Optimizing models for printing (Fusion 360)
- Log back into Fusion360 at https://fusion.online.autodesk.com/
- Open your object project from week 1
- Choose File > Export to launch the project viewer
- Download your model as an STL from the menu on the left hand side
Fusion will generate your model and send you an email.

- Download the file by clicking the link in the email
- Click on the file in the Finder or Windows File Explorer and examine the preview. If it looks solid, you should be good

Formware Cleaning
One of the easiest free options to quickly get a clean model for printing: the online Formware service at https://www.formware.co/OnlineStlRepair
- Go to the Formware service, and upload your stl file
- You may need to wait for the queue and the file to process.
- You may need to wait for the queue and the file to process.


- Download the cleaned and fixed model
- For Fusion360 creations, you probably won’t have a lot of problems, but for models created in SketchUp or other software, or photogrammetry models, you’ll have many more.
- Put the original and cleaned STL file in your google drive folder alongside the image exports
- Save it as LastName_ObjectName.stl and LastName_ObjectName_fixed.stl
e.g. Mason_Die.stl and Mason_Die_fixed.stl
- Save it as LastName_ObjectName.stl and LastName_ObjectName_fixed.stl
Next week, we will tour the MakerSpace and if you want you can set up a print job to print your model.
Continuing the Museum Modeling Lab
For the rest of the class period we will continue working with the group lab project based on your chosen object.
- Return to Tuesday’s Lab instructions and re-download Autodesk ReCapPhoto and Desktop Connector
- Process your model (if you haven’t yet) or load it locally
- Work with the editing tools to clean up and scale the model as best you can.
- If you are happy with your model, export an STL as well as the other formats, and run it through the process above, so that we can 3D print it later this term.
Reflective Blog Post (due Friday)
For this week’s blog post, reflect on your experiences with the Museum project so far in light of the readings and examples of photogrammetry and cultural heritage modeling you’ve explored.
- How does attempting to model an object compare to simply viewing one in an exhibition?
- Does the process of photogrammetry encourage close looking and attention to details you might otherwise have ignored?
- Does engaging with objects in this way make you more curious about this (and/or other) things, as well as the stories they can tell?
- How does moving from passive observer to active modeler change your thinking on communicating about art and history to various publics?
As you are still in the midst of this project, this is more of a status update than final polished essay. Describe what you’ve done and ponder one or more of the questions above.