
Process
3D modeling did not, and does not, come easily to me. I have a Mac, which makes systems like Autodesk Fusion 360 slower and more buggy. I often forget to use a mouse. I tend to try the same thing over and over when I get stuck. None of these traits helped me very much with our first assignment, a die. I tried to figure out how to create the pips for hours by drawing circles in sketch, then extruding them. This did not work. On Thursday, a classmate told me to use the “create” tool to add a sphere that would cut into the die. After class, I quickly created this model:

To be 100% honest, there are still a few bugs with the die I need to work out. However, I wanted to begin focusing on my important object. For that exercise, I chose to create a model of my Hydroflask water bottle. I carried the 32 oz thing everywhere with me for eight weeks working while working at a summer camp. I am blessed to both not have had heatstroke nor hit a child with it accidentally all summer.

I decided not to worry about the stickers and simply focus on building the body of the bottle. I did so by using the “create” function to create shapes as opposed to drawing then extruding, as I had with the die. This made the process a bit quicker.

In addition to stickers, I also had to compromise on the color of my design: I could not find a pink to use in Fusion 360, so I used red as a stand-in.
I think the main thing that bogged me down was the lid of the bottle. Figuring out how to get the square-yet-rounded handle and the slopes up to the lid took me a long time. I’m still not 100% happy with it, as I think it needs to be a bit rounder on the top, but I’m very proud of the straw detail.
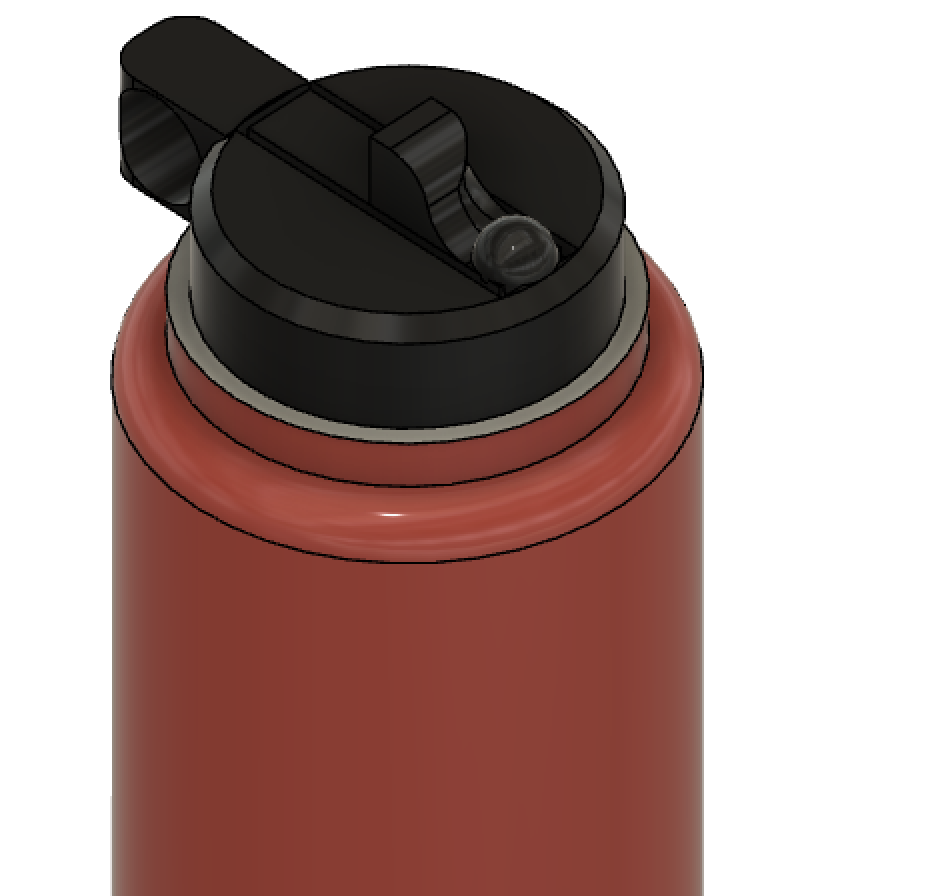
Another frustration that I have not had the chance to fix is the square piece taken out towards the bottom of the bottle. I’m not sure how it happened, so I’m not quite sure how to fix it yet.

Conclusion
Before placing new shapes, I’d really recommend checking the sidebar to see if that shape will “cut” into or “join” the original body it is being placed onto. Cut spheres created the pips in the die, and a joined sphere created the round detail on the water bottle lid.
I think an interesting humanistic usage of 3D modeling could be recreating objects as remembered by older generations. If a grandparent could describe an object, and then a person could make it, we would have one more way to pass down our unique histories to each other.
The main two pieces of advice I’d give to someone before using this software: be patient because it will crash and ask for help because you will need it.
Links:
Drive: https://drive.google.com/drive/u/3/folders/1Kdrij_OexNrvk8VhZwmxLfamlVkjQrLX
Fusion: https://a360.co/3BiesLu
2 thoughts on “3D Modeling a Water Bottle”
Comments are closed.
Wow this looks really amazing! I too really struggled with getting the curvature at the top of my can correct. It was frustrating and does not look like I want it to look. How did you manage to do the straw thing on the top? You didn’t mention that as an area of difficulty but it seems to me like that would be such intense detail and be quite tedious.
Bravo
This is a really impressive water bottle! It totally makes sense on having to compromise on the stickers because of both the amount of detail each would require but also getting them on the curvature of the cylinder would be hard. I would love to hear about how you got the straw on the top. How did you get the semi-circle shape extruded?